Plugins
Best Pitch Shifter Plugins for Vocals
A pitch shifter plugin moves a sound up or down in pitch without changing its length. On vocals, that one job turns into many: fixing a take that sits a...
A reverse reverb is the swell you hear rising into a vocal phrase, a snare or a drop: the reverb tail plays backwards, so the space grows before the sound arrives instead of fading after it. It is one of the most recognizable transitions in pop, trap, EDM and film scores, and there are several ways to make one. This guide explains how the effect works, compares the main methods and plugin types, and shows how to use a reverse reverb so it fits the track instead of washing over it.
A normal reverb adds a tail after a sound. A reverse reverb flips that tail in time, so it starts quiet and builds toward the original sound. Because a reverb tail depends on the audio that feeds it, the effect cannot be done fully in real time on the exact phrase you are playing: the plugin or the producer has to know what comes next. That is why every method below involves some form of rendering, either by hand or inside the plugin.
The classic manual technique has four steps:
It works in any DAW, but it takes several minutes per transition and every change to the reverb means rendering again.
Every major DAW can reverse audio and render a reverb tail, so you can build reverse reverbs with no extra plugin. You get complete control over the reverb, the length and the fade, and you learn exactly how the effect is made.
The cost is speed. A track with a dozen transitions means a dozen render-reverse-render passes, and trying a different room or a shorter swell sends you back to the start.
Best for: occasional transitions, and producers who want to understand the process.
Some reverb and delay plugins include a reverse mode that plays reflections backwards as you play. These are useful for texture and ambience, because the effect follows the audio continuously. Since they cannot know the future, the swell they create comes after each sound rather than leading into it, which gives a different result from a true pre-swell transition.
Best for: ambient textures, pads and dreamy vocal effects rather than transitions into a downbeat.
A dedicated reverse reverb plugin automates the manual method. You give it the sound, it renders the reversed tail for you, and you place the result.
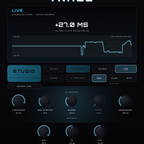
TuneDrip's reverse reverb plugin, Ghost, works this way. You press CAPTURE while the phrase plays, or drop an audio file, and Ghost renders the reversed tail. Five knobs shape the swell:
When it sounds right, you drag the rendered audio straight onto the track, before the downbeat. Ghost exports 24-bit WAV at your session sample rate. It is not a normal reverb: it renders reversed swells for transitions and exports them as audio, so you keep the result as a clip you can edit, fade or move.
Best for: producers who make many transitions and want to try several shapes quickly.
A reverse swell is often one layer of a larger transition. Three other TuneDrip plugins cover the rest:
All of them are in the space and time plugins collection. Ghost, Drift and Mirage are also grouped in the space pack bundle.
Mostly for transitions: a swell that leads into a vocal phrase, a snare or a drop. It is also used for ghostly, dreamlike textures on vocals and instruments.
A true lead-in swell needs the audio that comes next, so it has to be rendered, either by hand or inside a plugin. Real-time reverse modes create a different effect that swells after the sound.
No. Ghost renders reversed reverb swells for transitions and exports them as audio you drag onto a track.
24-bit WAV at your session sample rate.
It depends on the section. A short swell of about a beat works as a breath before a word; a longer one of a bar or more works as a build into a drop.
Ready to try it? Get the reverse reverb plugin, or browse all space and time plugins.